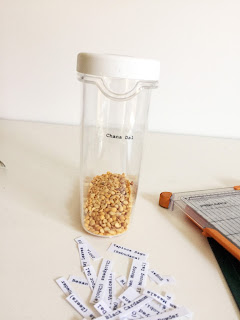
Pantries come in all sizes: small, big, walk-in, drawers, shelves, roll-out compartments… and the list goes on. Whatever may be the size, these clear labels can adore pantry jars in all. So excited to share a fun way to make clear labels, perfect for the pantry jars and knick-knacks! Turn a clear packaging tape into clear labels using the image transfer technique!
For this project, you’ll need this stuff:
Supplies
- Clear tape. I feel stronger the tape, the better the labels
- Inkjet printer
- Scissors or Paper Trimmer
Step 1:
Print text labels on paper using inkjet printer. Cut paper to size with the help of Paper trimmer or Scissors.
Step 2:
Place the sticky side of the tape onto the text.
Step 3:
Burnish it with the help of a bone folder or a scorer to make sure it is pressed evenly. Image transfers will be best if pressure is evenly applied.
Step 4:
Remove back of the label with water.
If you would like to create a lesser mess, drop it in a bowl of water for a few minutes to remove the backing paper more easily. {I was kind of enjoying this! ;)}
Step 5:
Place label on pantry jars. Doesn’t the clear labels look gorgeous on the pantry jars?
Step 6:
Admire your organized pantry! xo. Divya


No comments:
Post a Comment